Quick Start
Illustrated guide: sign up, API keys, connectivity checks, and client setup
Quick Start
AutoRouter is a unified AI model gateway compatible with the OpenAI API format. With a single Base URL and API Key, you can call GPT, Claude, Gemini, Kimi, and other mainstream models through one interface—without managing separate accounts for each provider.
Part 1 — Get Started
Follow the steps below in order to register, create an API key, and verify connectivity. Each step includes screenshots and completion checkpoints.
How to Use This Guide
- Complete Steps 1 → 6 in order—do not skip ahead.
- Compare your results with the expected outcome and completion checkpoint for each step.
- Screenshots show the real console UI—follow the highlighted areas.
- You only need these three values throughout:
| Name | Description | Where to Get It |
|---|---|---|
| API URL (Base URL) | Unified gateway endpoint | API Keys page |
| API Key | Credential, usually starting with sk- | Copy when creating a key |
| Model name | Model to call, e.g. gpt-5.4 | Model Plaza |
Step 1 — Open the Website
1.1 Open the Homepage
| # | Action |
|---|---|
| 1 | Open a browser (Chrome, Edge, etc.) |
| 2 | Enter the platform URL (e.g. https://autorouter.top) |
| 3 | Press Enter and wait for the homepage to load |
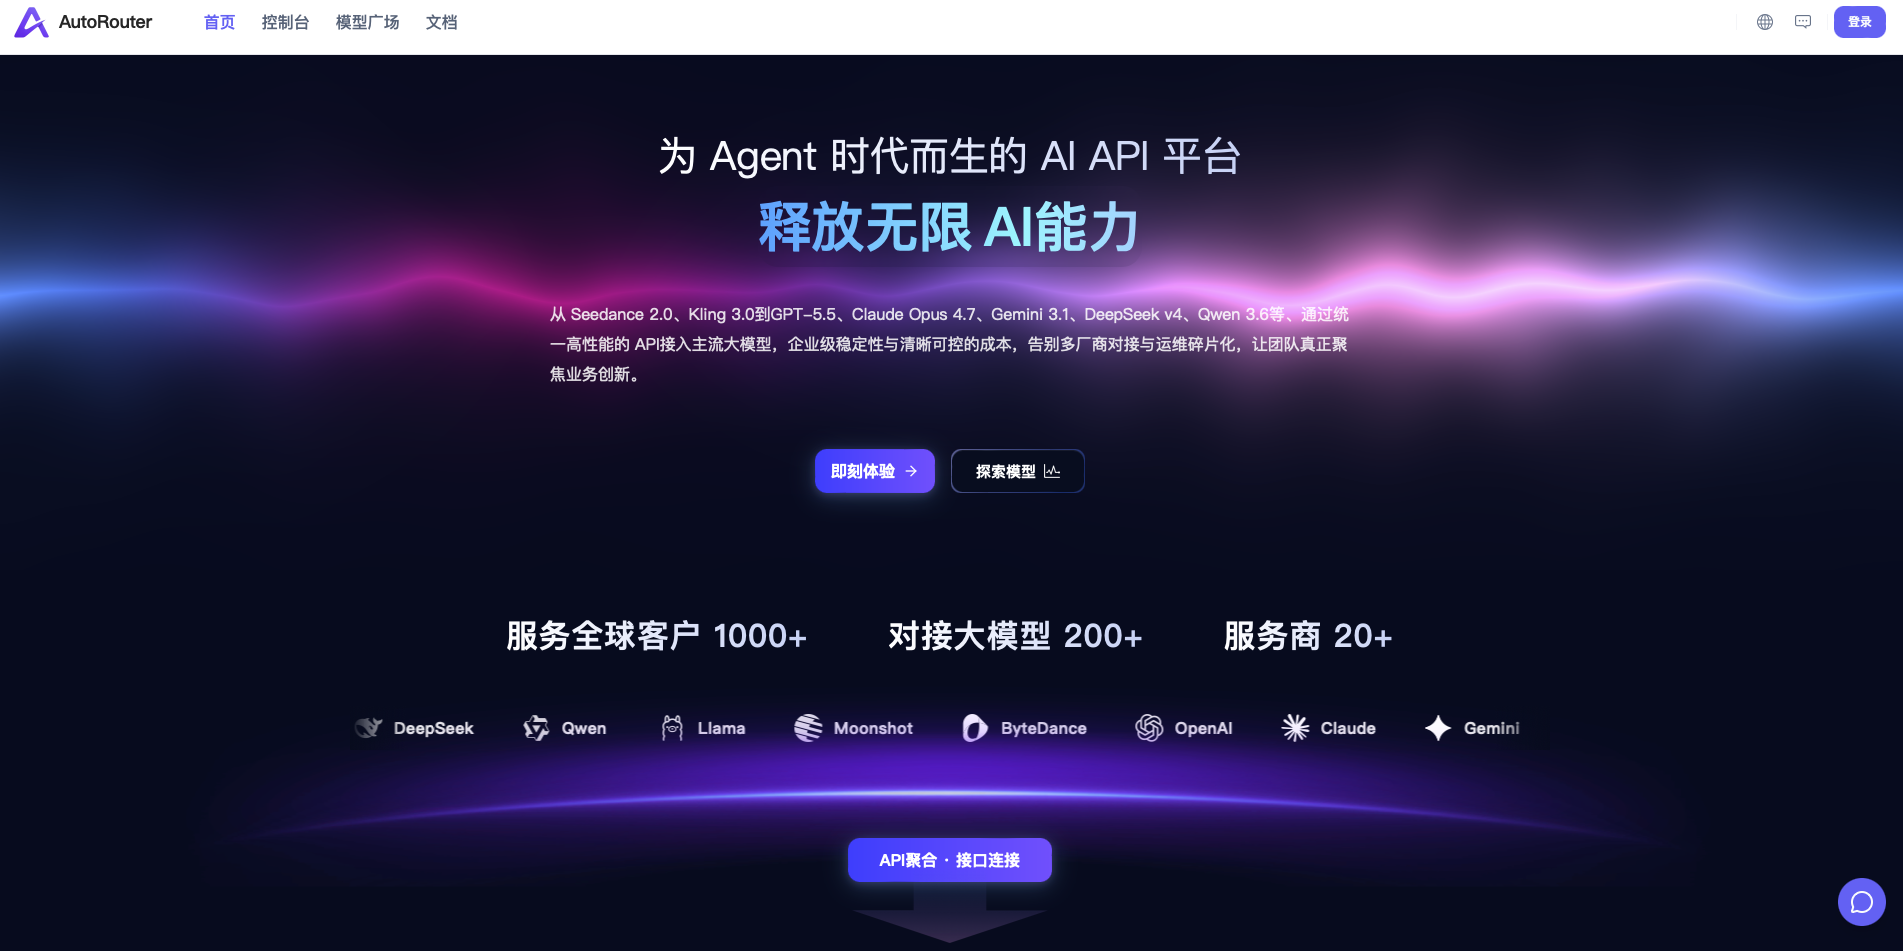
Expected result — The page loads normally; Sign in is visible in the header.
Step 2 — Register and Sign In
2.1 Register (if you don't have an account)
| # | Action |
|---|---|
| 1 | Click Sign up |
| 2 | URL changes to /sign-up |
| 3 | Fill in username/email, password, etc. |
| 4 | Complete captcha if prompted |
| 5 | Click Sign up / Submit |
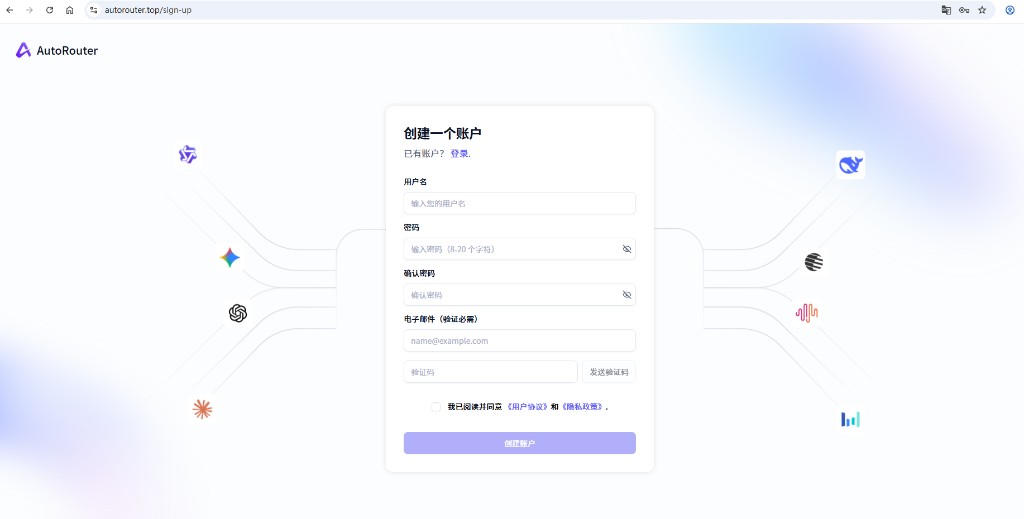
Expected result — Success message, or redirect to sign-in / dashboard.
2.2 Sign In (existing account)
| # | Action |
|---|---|
| 1 | Click Sign in (usually /sign-in) |
| 2 | Enter credentials |
| 3 | Click Sign in |
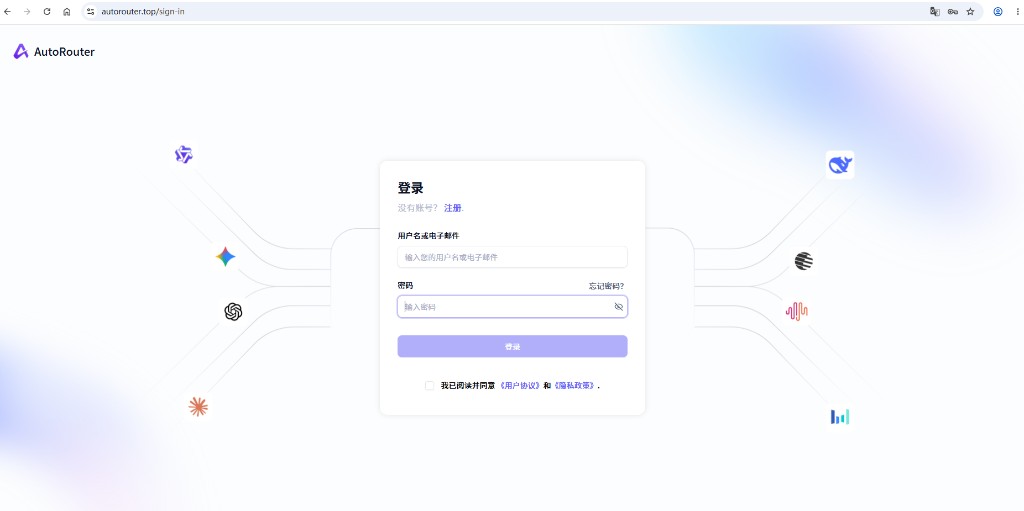
2.3 Open the Dashboard
| # | Action |
|---|---|
| 1 | From the homepage, click Dashboard in the header (/dashboard) |
| 2 | Confirm the left sidebar menu is visible |
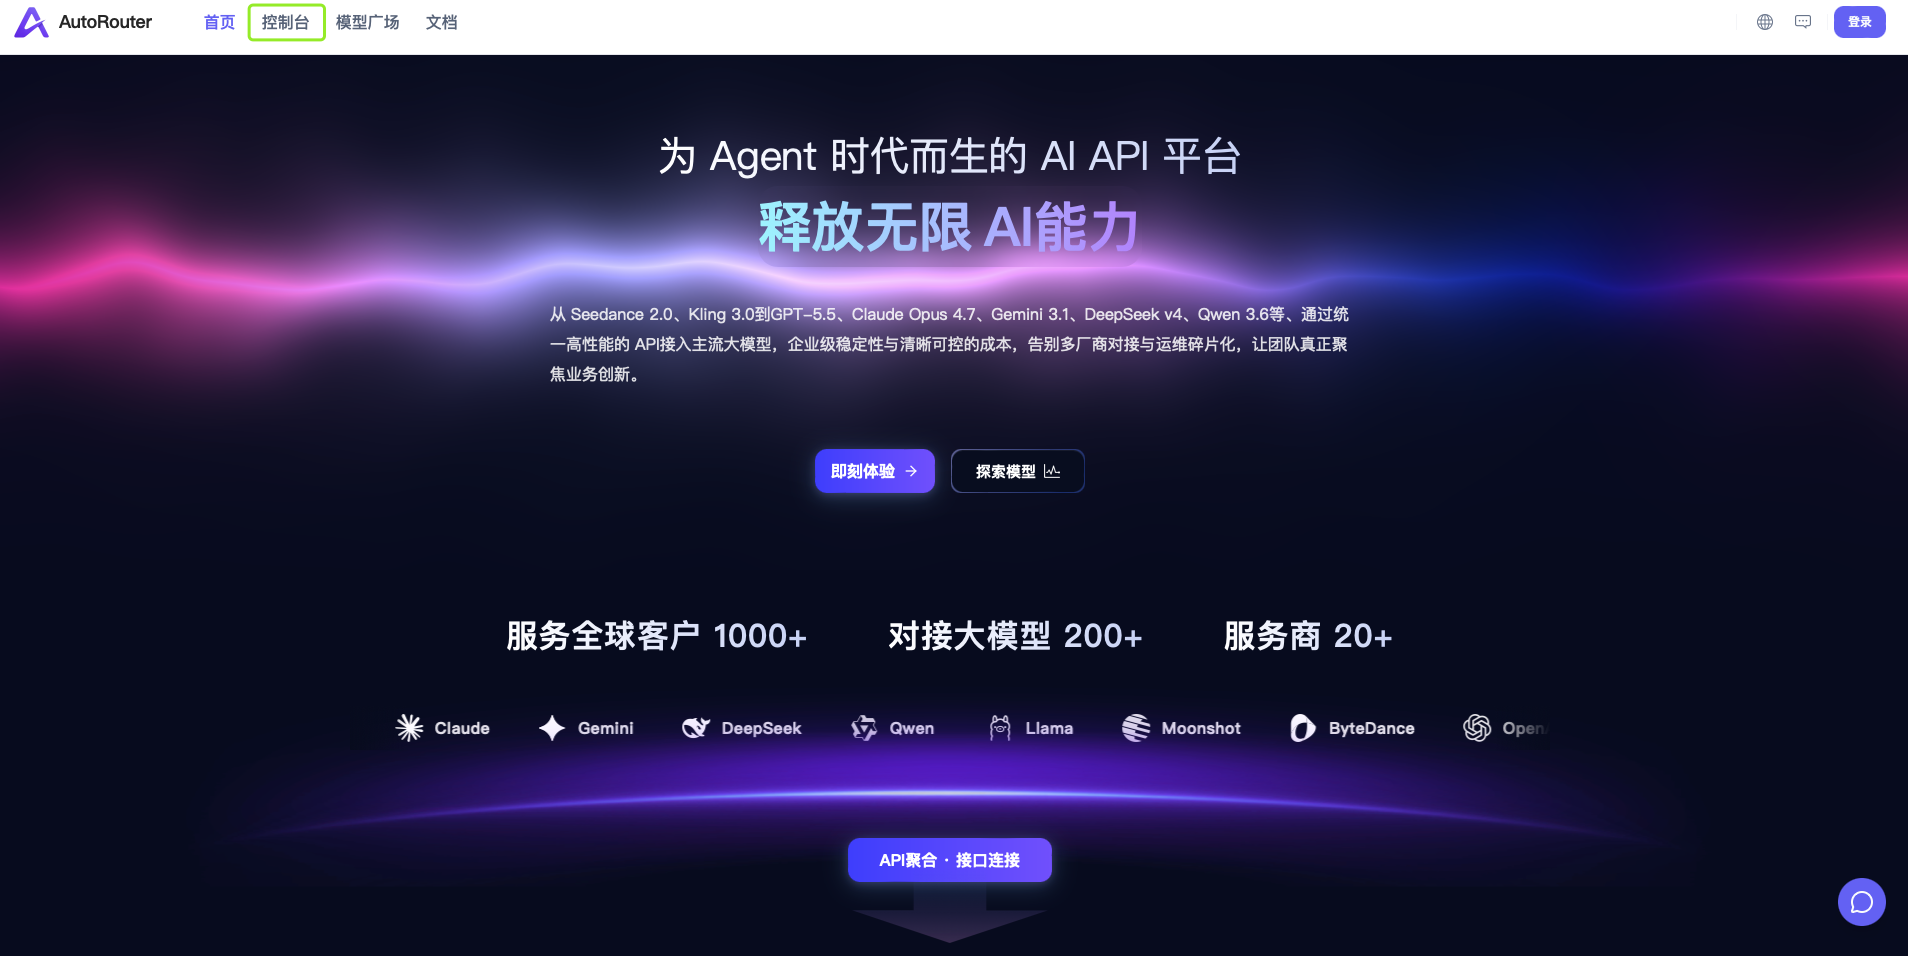
✅ Step 2 complete — Signed in; sidebar shows API Keys, Playground, etc.
Step 3 — Create an API Key
API keys authenticate all client and code requests.
3.1 Open API Keys
| # | Action |
|---|---|
| 1 | In the left sidebar, find the General group |
| 2 | Click API Keys |
| 3 | URL changes to /keys |
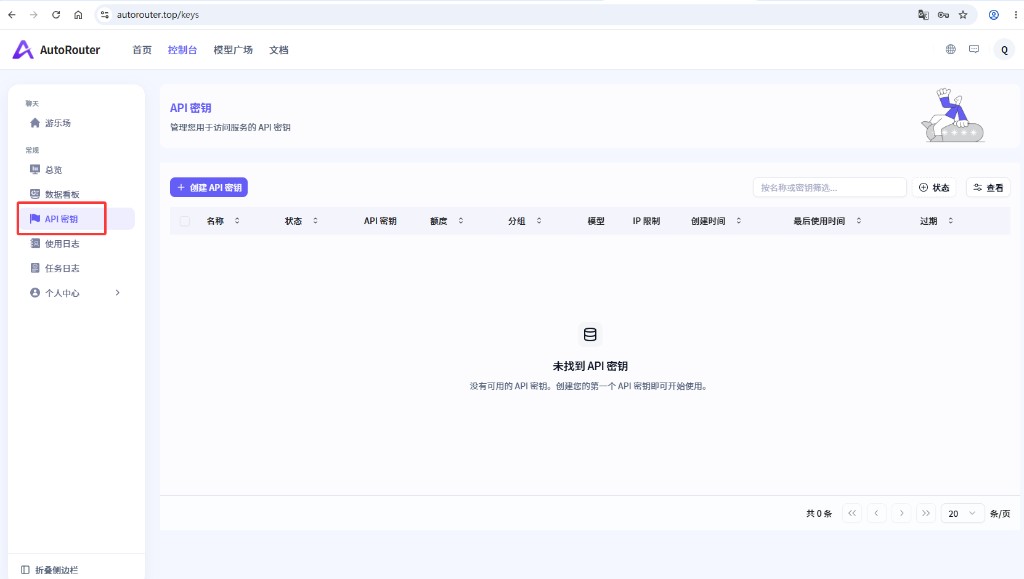
Expected result — Page title is API Keys; Create API Key button in the top-right.
3.2 Create a Key
| # | Action |
|---|---|
| 1 | Click Create API Key (top-right) |
| 2 | Creation form opens on the right |
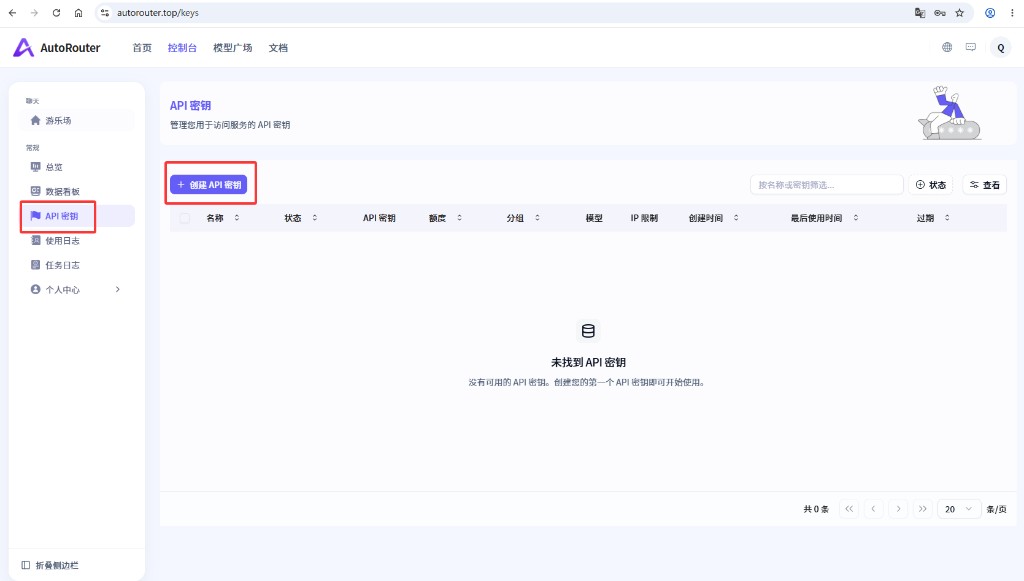
3.3 Fill the Form
| # | Action | Notes |
|---|---|---|
| 1 | Name | e.g. daily-chat |
| 2 | Group / quota / model limits | Defaults are fine for first use |
| 3 | Click Create / Save | Wait for completion |
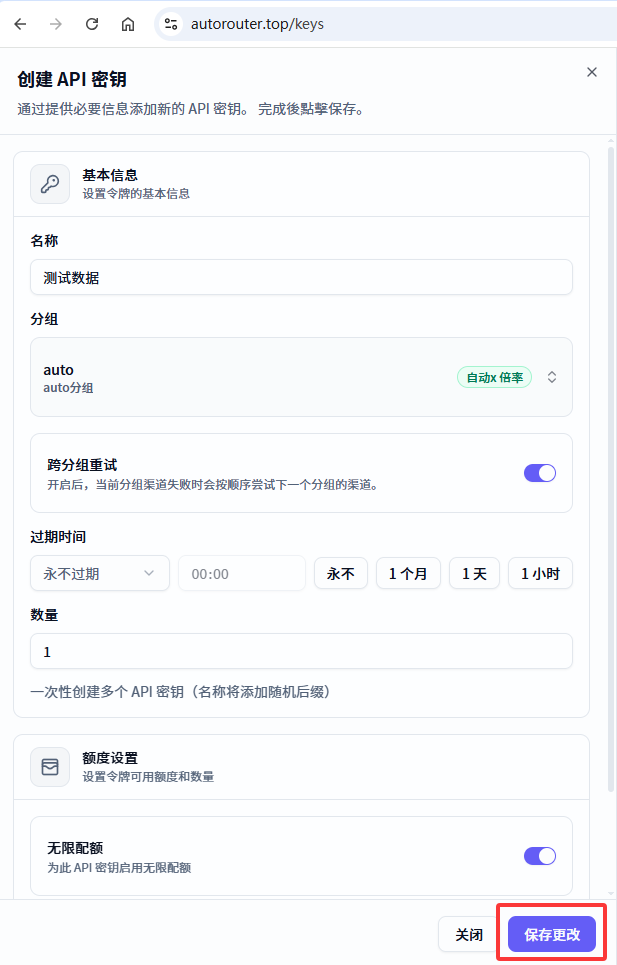
3.4 Copy and Save
| # | Action |
|---|---|
| 1 | Find the API Key in the success message or list |
| 2 | Click Copy or select and copy manually |
| 3 | Also note the API URL (Base URL) |
| 4 | Store both in a password manager or secure note |
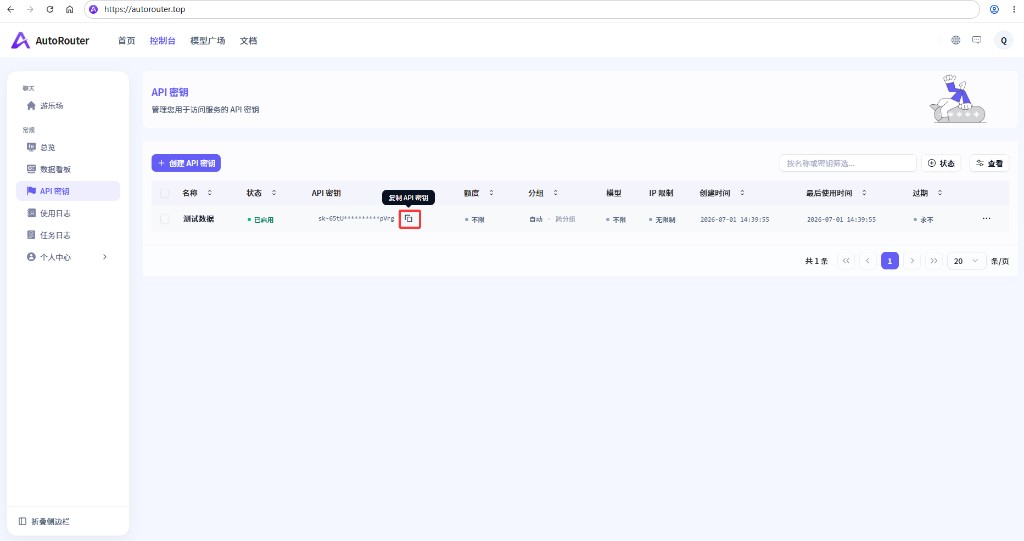
⚠️ Important: Keys are often shown only once. Do not share publicly; revoke and recreate if leaked.
✅ Step 3 complete — API URL and API Key saved securely.
Step 4 — Verify Connectivity
Use Playground in the console to send a test message.
| # | Action |
|---|---|
| 1 | Under Chat, click Playground (/playground) |
| 2 | Select a model (e.g. gpt-5.4) |
| 3 | Type Hello and click Send |
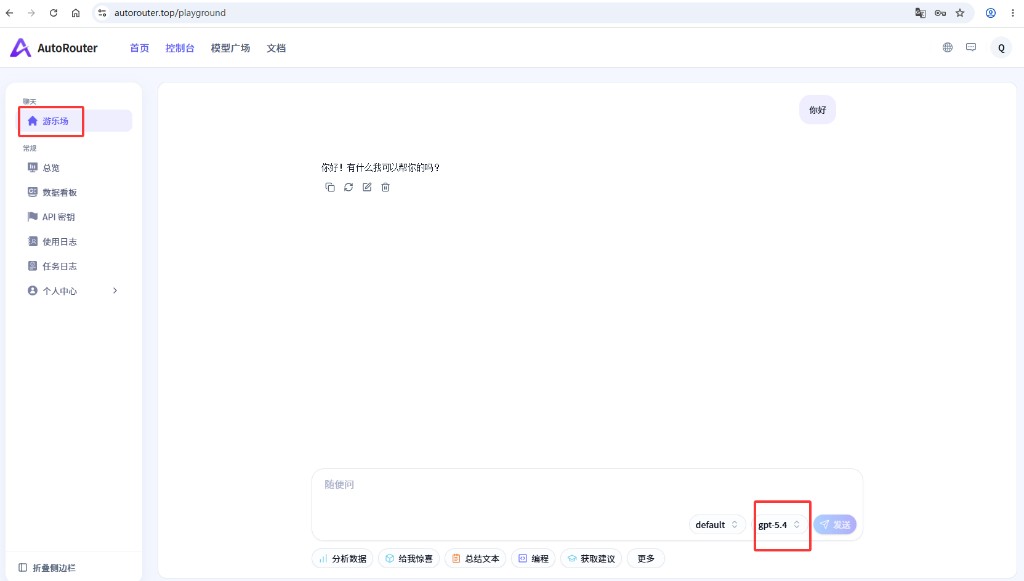
Expected result — You receive a text reply from the model.
✅ Step 4 complete — Playground returns an AI response.
Step 5 — Get a Model Name
| # | Action |
|---|---|
| 1 | Open Model Plaza in the header or visit Model Plaza |
| 2 | Search for a model (e.g. gpt-5.4) |
| 3 | Click the copy icon on the model card |
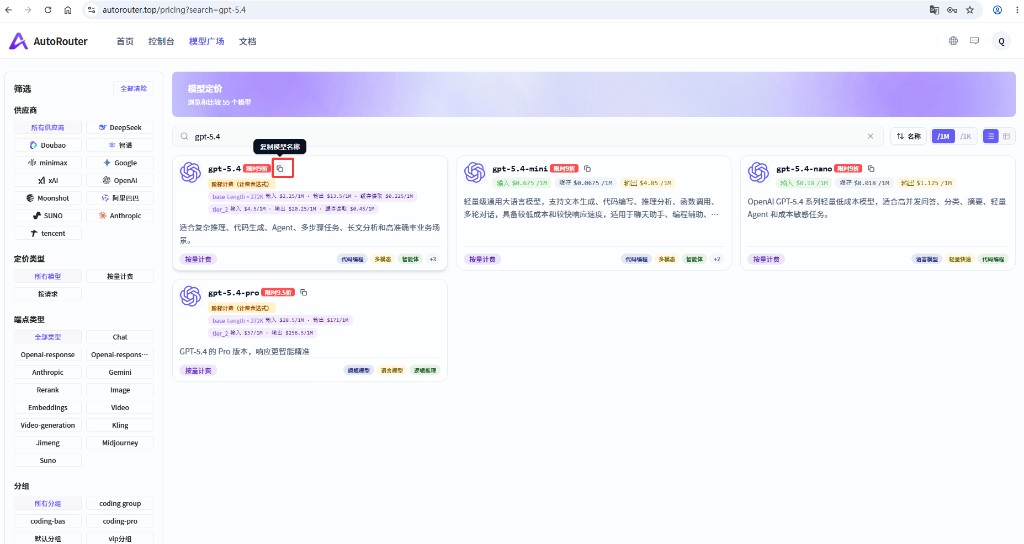
✅ Step 5 complete — At least one model name recorded.
Step 6 (Optional) — Connect Cherry Studio
This section uses Cherry Studio as an example. Any OpenAI-compatible client works with the same API URL, key, and model name.
6.1 Install the Client
- Download from Cherry Studio and install.
6.2 Add a Provider
| # | Action |
|---|---|
| 1 | Go to Settings → Model Providers → Add Provider |
| 2 | Choose OpenAI or OpenAI Compatible |
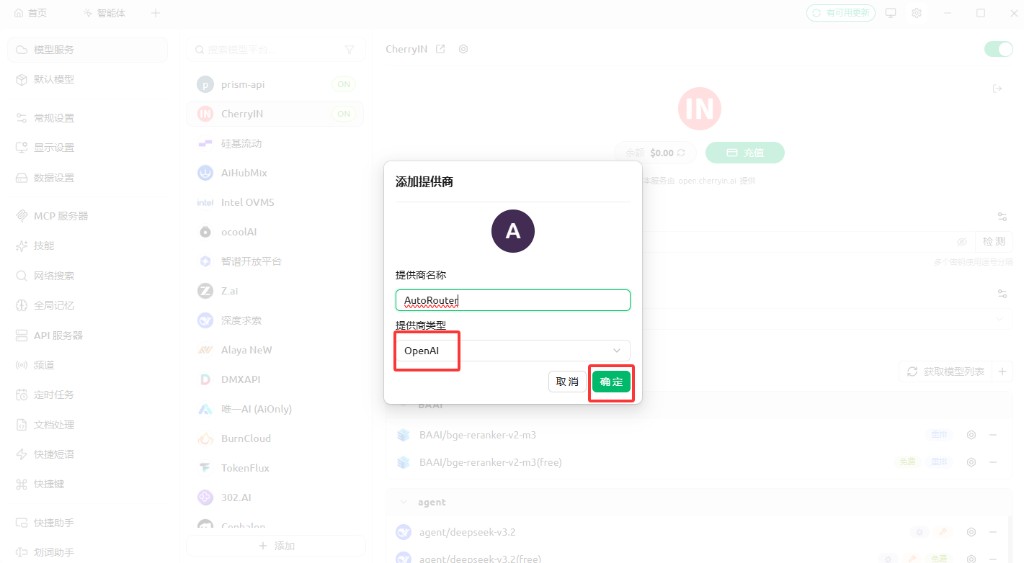
6.3 Enter Connection Details
| Field | Value |
|---|---|
| API URL / Base URL | Platform URL from Step 3 (most clients omit /v1) |
| API Key | sk-... from Step 3 |
| Model | Name copied in Step 5 |
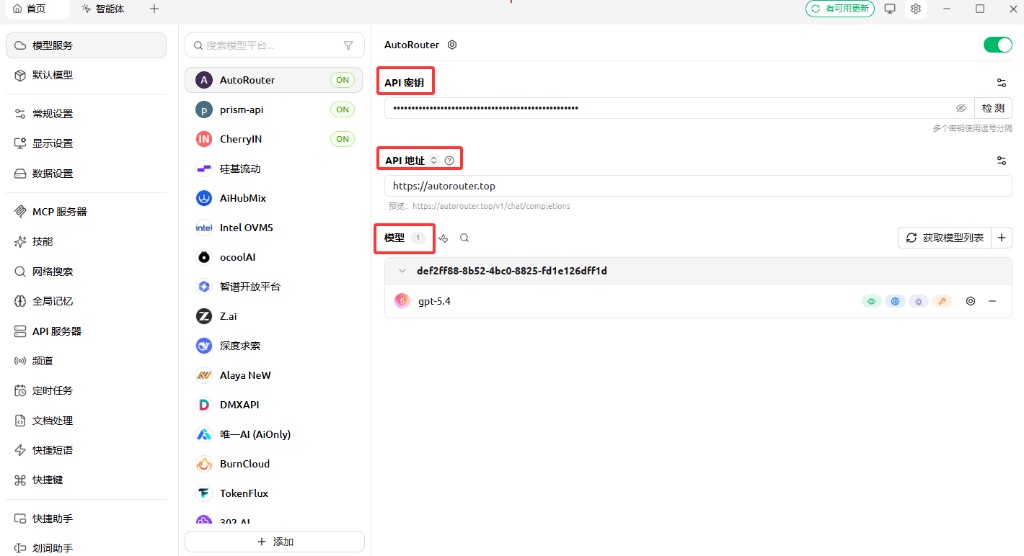
6.4 Add Model from Library
| # | Action |
|---|---|
| 1 | Open AutoRouter Models, search gpt-5.4 |
| 2 | Click + to add the model |
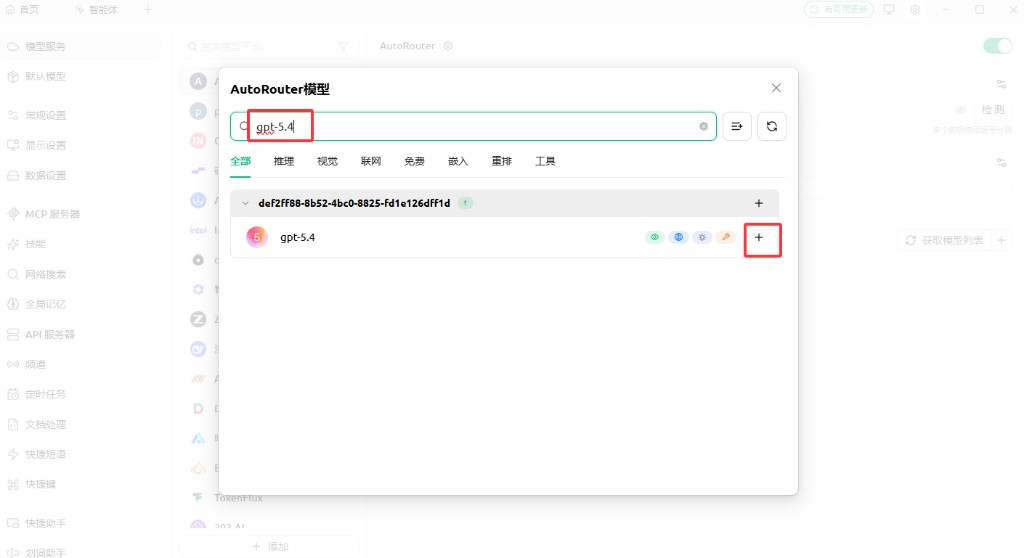
Expected result —
gpt-5.4appears in the model list.
6.5 Add Model Manually (if not found)
| # | Action |
|---|---|
| 1 | Click + or Add Model next to the model area |
| 2 | Set Model ID / Name / Group to gpt-5.4 (or your copied name) |
| 3 | Confirm Add Model |
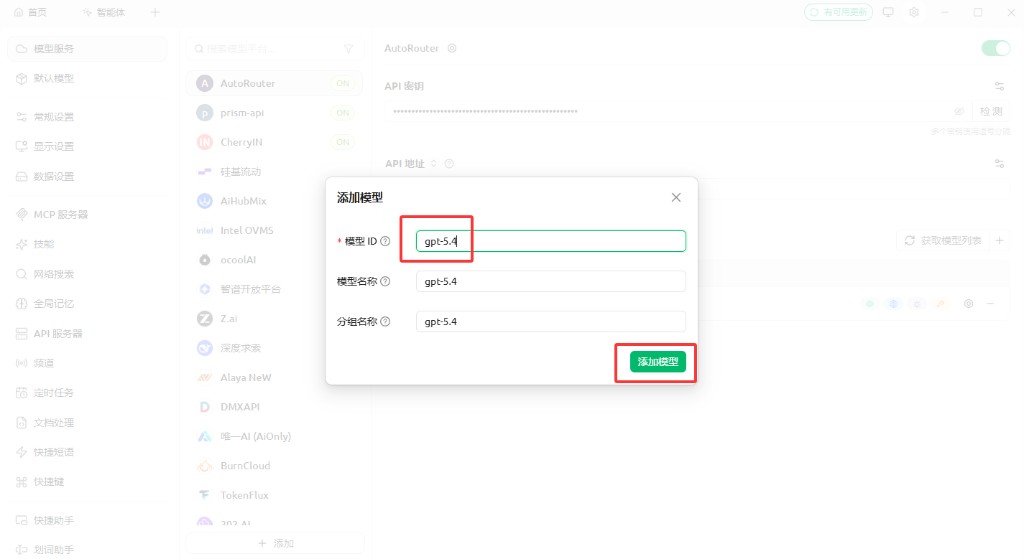
6.6 Test Chat
After saving, go to Home, select the model, send Hello, and expect a reply.
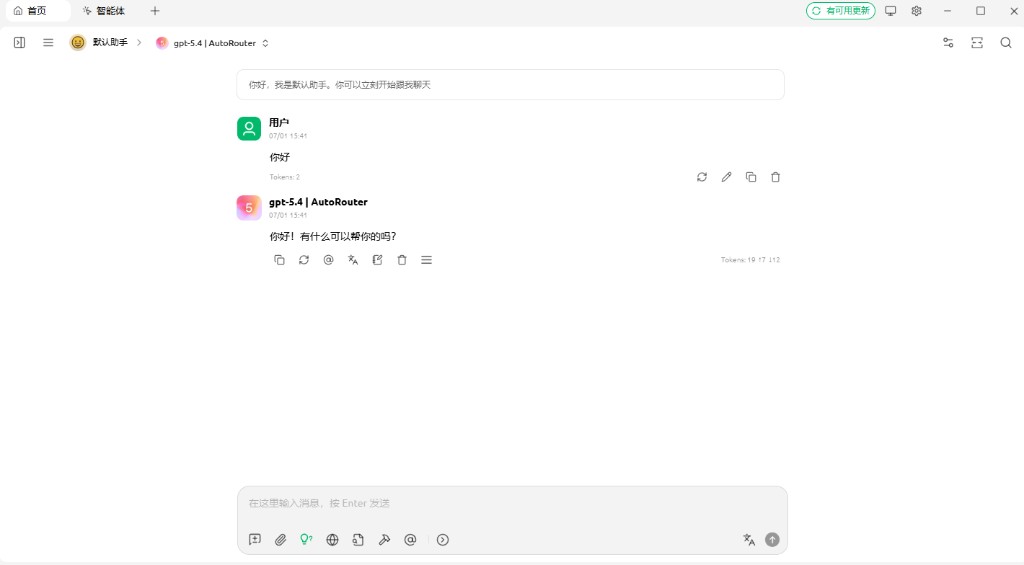
✅ Step 6 complete — Cherry Studio (or another client) chats successfully.
Part 2 — Developer Integration
After the quick start above, use these examples to integrate via SDK or CLI. The platform is OpenAI-compatible—replace base_url and api_key with your values.
2.1 Prerequisites
| Parameter | Description |
|---|---|
| Base URL | https://api.autorouter.top/v1 (SDKs usually include /v1; curl paths below already include it) |
| API Key | sk-... from Step 3 |
| Model name | From Step 5, or query via 2.4 |
2.2 Verify with curl
curl https://api.autorouter.top/v1/chat/completions \
  -H "Content-Type: application/json" \
  -H "Authorization: Bearer sk-yourAPIKey" \
  -d '{
    "model": "gpt-5.4",
    "messages": [
      {"role": "user", "content": "Hello, introduce yourself"}
    ]
  }'
2.3 Python SDK
from openai import OpenAI

client = OpenAI(
    base_url="https://api.autorouter.top/v1",
    api_key="sk-yourAPIKey",
)

response = client.chat.completions.create(
    model="gpt-5.4",
    messages=[
        {"role": "user", "content": "Hello, introduce yourself"},
    ],
)

print(response.choices[0].message.content)
2.4 List Available Models
curl https://api.autorouter.top/v1/models \
  -H "Authorization: Bearer sk-yourAPIKey"
The id field in the response is the model parameter for API calls.
Part 3 — Connect Your Tools
Any OpenAI-compatible client needs only these three values:
3.1 Three Essentials
| Parameter | Value |
|---|---|
| API URL (Base URL) | https://api.autorouter.top |
| API Key | Key created in the console |
| Model name | From /v1/models or Model Plaza |
3.2 Claude Code / Codex CLI
For CLI coding assistants, set:
export OPENAI_API_KEY="sk-yourAPIKey"
export OPENAI_BASE_URL="https://api.autorouter.top/v1"
3.3 OpenClaw
Add to ~/.openclaw/openclaw.json:
{
  "models": {
    "mode": "merge",
    "providers": {
      "autorouter": {
        "baseUrl": "https://api.autorouter.top/v1",
        "apiKey": "sk-yourAPIKey",
        "api": "openai-completions",
        "models": [
          { "id": "gpt-5.4", "name": "GPT-5.4" }
        ]
      }
    }
  },
  "agents": {
    "defaults": {
      "model": {
        "primary": "autorouter/gpt-5.4"
      }
    }
  }
}
3.4 Other OpenAI-Compatible Tools
- API URL / Base URL →
https://api.autorouter.top - API Key → Your console key
- Model name → From
/v1/models
More verified app guides: Agent Tools.
Part 4 — API Overview
| API | Endpoint | Description |
|---|---|---|
| Chat completions | POST /v1/chat/completions | Multi-turn chat, streaming, tool calling, structured output |
| Text completions | POST /v1/completions | Legacy completion API |
| Image generation | POST /v1/images/generations | AI image generation |
| Video generation | POST /v1/videos | AI video generation |
| Model list | GET /v1/models | List available models |
Full reference: API Docs.
Part 5 — Troubleshooting
| Issue | Suggestion |
|---|---|
| Can't find API Keys | Ensure you're signed in; open API Keys directly |
| 401 / invalid key | Copy the full key; check expiry or disabled status |
| Insufficient quota | Top up wallet or contact admin |
| Model not found | Copy the correct name from Model Plaza |
Should URL include /v1? | Chat clients usually omit it; SDKs usually include it |
Part 6 — More Help
| Need | Resource |
|---|---|
| Parameters, error codes | API Docs |
| More client integrations | Agent Tools |
| Deployment, billing | Contact your site administrator |
Quick Start
AutoRouter is a unified AI model gateway, fully compatible with the OpenAI API format. With a single API Key and Base URL, you can access dozens of leading AI models — GPT, Claude, Gemini, Kimi, and more — without managing separate accounts or credentials for each provider.
API Docs
API Docs